


Made-to-Measure vs Graded Crochet Patterns: What They Really Mean
- Jan 4
- 4 min read
Made-to-measure crochet patterns are everywhere these days, but the phrase "made to measure" doesn't always mean the same thing. If you've ever felt frustrated by a pattern labeled made to measure, it's likely because the designer didn't write the pattern in the best way. There isn't a clear set defined way of creating them, so a lot of designers get lost along the way.
I design size-inclusive patterns and love the logical side of fit, so here's a clear guide to what made-to-measure actually is, how it differs from graded patterns, the common types you'll encounter, and how to pick a pattern that won't leave you frustrated.
What is a graded pattern?🧶
A graded pattern is the "off the rack" option. It gives a set range of sizes with a measurement chart, extra small through 5X, for example, where each size corresponds to a fixed body measurement. You pick the size that best matches your measurements and follow the stitch and row counts for that size.
Graded patterns are straightforward and beginner-friendly. They’re great when your body fits standard measurements closely, but they can be limiting if your proportions differ from the chart. You might need to add rows to sleeves, change armhole depth, or adjust waist shaping, depending on how your body compares to the listed sizes.
What is made to measure? 📏
Made-to-measure patterns are tailored to your personal measurements, rather than relying on a predefined size chart. Instead of selecting a size and following static stitch counts, you measure your body and calculate, or let the pattern calculate, how many stitches and rows you need to match those measurements.
The goal of a made to measure approach is a better fit. It’s like having a tailored garment instead of something from a rack: the result should match your proportions more closely, whether you need extra length in the torso, longer sleeves, or a different bust ease.
Common misconceptions about made to measure 🤔
The biggest misconception is that made-to-measure is a single, clearly defined method. It isn’t. Designers vary widely in how they implement made-to-measure, and that variation is why some crocheters love it while others hate it.
If your first made-to-measure experience involved vague instructions like "measure and adjust as you go," it’s understandable you might have disliked it. But that doesn’t mean every made-to-measure pattern is the same. The term only tells you the pattern is intended to be personalized; it doesn’t tell you how that personalization happens.
Types of made to measure patterns 🔧
When you see "made to measure" on a listing, the pattern usually falls into one of a few approaches. Knowing which is used will save you time and frustration.
Build-as-you-go: Make a foundation chain or panel and hold it up to your body. Continue until it feels right. This is simple and common in beginner designs, but it’s not ideal for complex stitch patterns or shaping.
Measure-then-chain: Measure your body first and use a formula to determine the starting chain length (for example, divide chest circumference by two and add ease). This is better than eyeballing, but chains often shrink once stitches are added, which can lead to fit issues.
Gauge-based calculation: Make a gauge swatch, calculate stitches per inch, and then compute exact stitch and row counts from your measurements. This is more accurate but requires some math and familiarity with gauge.
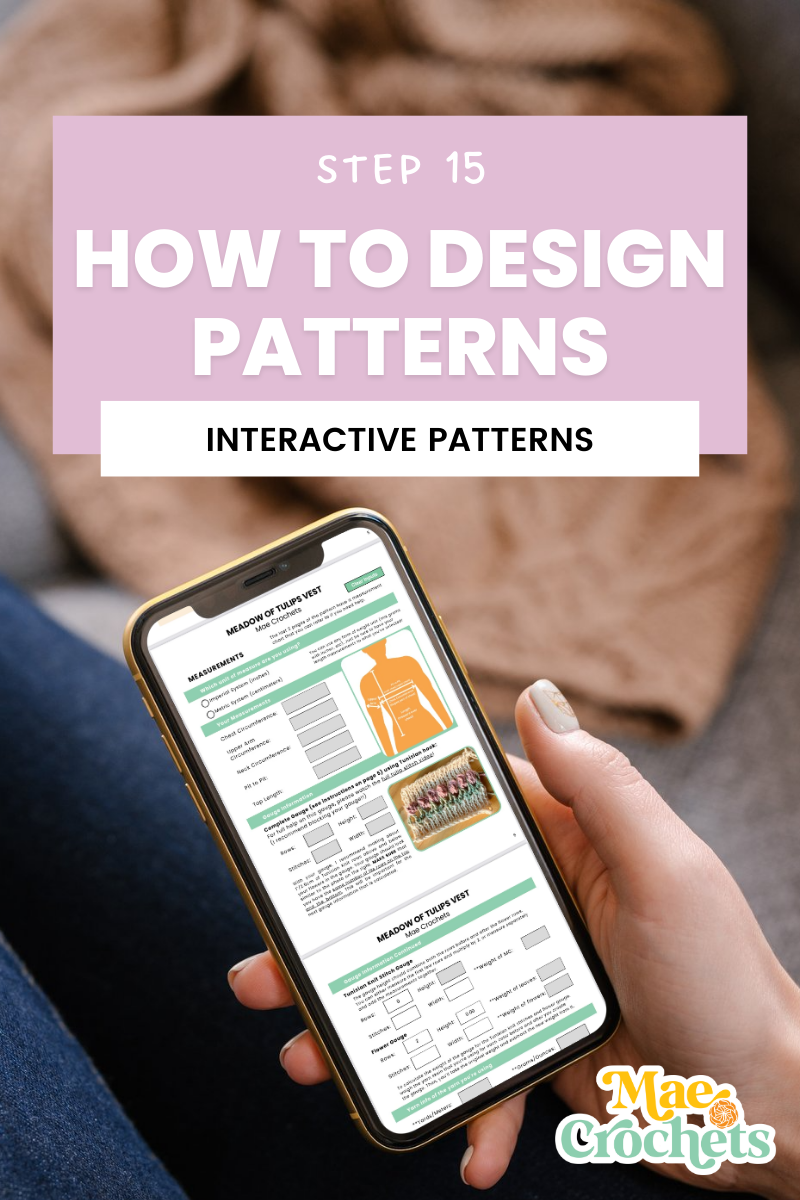
Interactive tools: The designer provides a calculator (Excel, web form, or embedded PDF) where you input your measurements and gauge, and the tool outputs stitch and row counts. This combines the accuracy of gauge-based calculation with beginner-friendly automation.
Which type is best?
I prefer gauge-based and interactive approaches because they give precise stitch and row counts tailored to your body without constant measuring while you crochet. These types reduce surprises and fit problems mid-project.
How to spot a good made to measure pattern ✅
Not all made-to-measure patterns are created equal. Here are signs that a pattern will actually help you achieve a personalized fit:
Clear measurement instructions: exact points to measure, how snugly to hold the tape, and body diagrams if needed.
Defined ease: the pattern tells you how much positive or negative ease is recommended and explains the effect of changing it.
Gauge-based math or automated calculations: the pattern explains how gauge turns into stitch and row counts, or includes a calculator that does it for you.
Rounding and stitch compatibility guidance: especially for complex stitches, the pattern tells you whether counts must be even, odd, or divisible by a specific factor.
Thoughtful shaping instructions: clear guidance on how to alter shaping points like waist, bust, and shoulders for different bodies.
Inclusive tester photos: images from testers of multiple sizes so you can see how the garment looks on various body types.
Interactive made to measure patterns 💻
Interactive patterns are my favorite evolution of the made-to-measure idea. You make a gauge swatch, enter your gauge and body measurements into the tool, and it returns stitch and row counts specific to you. This creates the precision of a graded pattern combined with the tailoring of made-to-measure.
Interactive tools can be Excel files, web forms, or embedded PDFs that perform calculations behind the scenes. The major benefit is that they force you to make a gauge, one of the most common reasons projects don’t fit, and they eliminate manual math errors.
You can read more about my interactive patterns (Mae to Measure patterns) here.
Summary and next steps 📝
Graded patterns are straightforward and work well if your proportions match the size chart. Made-to-measure patterns aim to tailor garments to your body and can dramatically improve fit. But made-to-measure is a method, not a single recipe: some implementations are beginner-friendly and vague, while others are precise and automated.
Before buying a pattern labeled made to measure, ask how the designer implements it. Look for clear measuring instructions, gauge-based math or an interactive calculator, and inclusive tester photos. If a made-to-measure pattern left you disappointed before, try a different designer or an interactive approach; you might be surprised at the difference!
Happy crocheting, and may your next garment fit like it was made for you, because it was!


Comments